Unity Basics - Writing Scripts
Just got unity installed and dealing with an avalance of buttons, features, long tutorials about placing pictures and shapes and things? Lets get our hand dirty instead and try a different approach - writing a basic script!
If you’re interested in game development who has done some basic programming before and like getting your hands dirty, this guide is for you. You’ll want to have at least some basic experience with variables, functions, some simple data structures, and loops. You’ll be using C#, but experience with it isn’t required at all! If you’re looking for a guide on how to install unity and create your first project, check out the install and setup guide.
Goals
- Write ‘Hello World’
- Make a Cube Dizzy
- Help the cube ascend to the astral plane
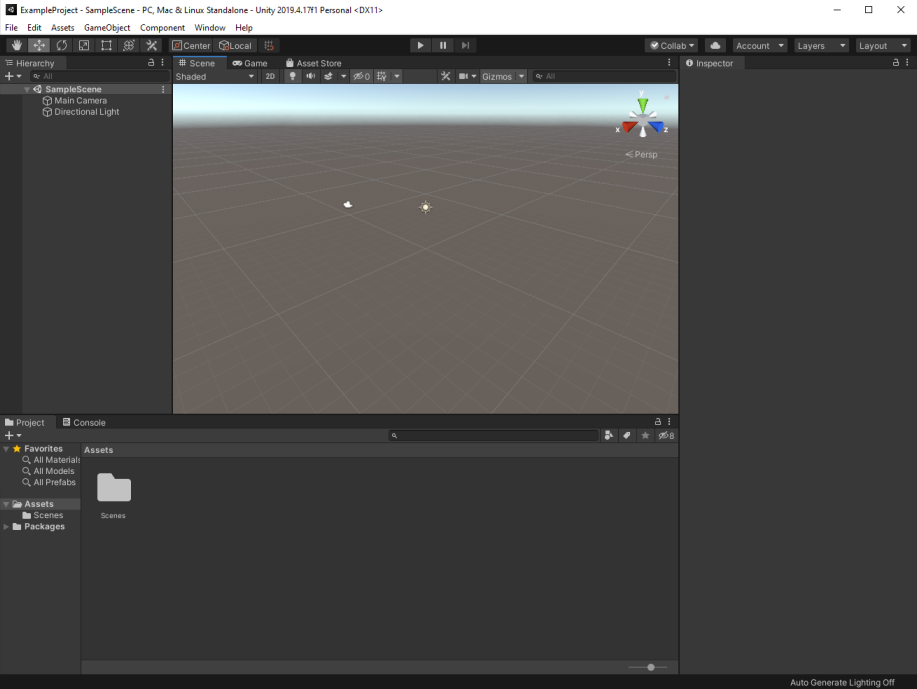
Before starting, please make sure you have unity editor open, similar to the following:
Writing our First Unity… Program? App? What’s it called?
Before I throw you in, I’d like to discuss quickly how unity works so you have some context. If you’re at all familiar with writing a hello world style program, then you’re likely familiar with the idea of the starting point of a program.
In the case of unity, we basically write many little programs that can hold their own data, talk to eachother, or create other little programs. We call these Components, and Unity calls them either Components, MonoBehaviours, or C# Scripts. These terms are largely used interchageably when talking about Unity or reading forum posts and Documentation. Just like programs, you can have separate files and data structures that work together - you have access to an entire programming language after all!
Now, because Unity uses the idea of these Components, it also allows you to collect them into groups so that they can be started and executed together. These groups happen to be called Game Objects, and can hold all sorts of different types of stuff on a Game Object in the form of components. What this means is that in order for things to happen, at some level we have to create a game object and then add one of the programs, or Components, to it.
Because we have so many of these components grouped together, each of them has their own ‘main’ or ‘starting’ function in a way!
Hello World!
Ok, now we know what to call the code we write, and how to think about it! Lets go ahead and create our own!
First, We’ll need that group of components we talked about, the Game Object, and we’ll have to put that somewhere - collections of these Game Objects are called Scenes. Fortunately, Unity is kind enough to provide us with this, and we’re actually looking at one by default.
What this means is we can interact with the existing scene to create a game object - we’ll use the Hierarchy for this. When right-clicking, you’ll notice that unity gives us a bunch of common game object categories with some pre-added components. We’ll select Create Empty because, well, we don’t need any of the common stuff to play around just yet.
You’ll notice that once we create a game object and select it, we get feedback in two separate windows other than the hierarchy - the Scene View and the Inspector. The Inspector shows the components that make up the game object, and you’ll see something called Transform there by default. Every game object in unity has to have this position and orientation data in to exist in a scene, and because of that in the scene view we see a little position indicator the in world showing where our game object is - in this case, at the point (0, 0, 0) - or, if you poked around in the scene already, approximately the center of wherever you’re looking. You can drag this crosshair slider about in the scene view to update the position, or update it on the component and either way it’ll be reflected in the other… but I digress.
Now that we have a GameObject, we can add our first component. Double-clicking on the component should open it in visual studio for you, and provide you with a bit of boilerplate code. (If Visual Studio doesn’t open by default, you can set this under Edit > Preferences > ExternalTools > Default Script Editor)
And, true to where we started, lets get get a hello world going inside the entry point of this component: Inside of the Start() function, we’ll add a basic print statement - in Unity, we can use Debug.Log() to accomplish this. Here’s just the start function:
void Start()
{
    Debug.Log("Hello World!");
}
Go ahead and save your file now, and head back over to Unity. We don’t have to do anything special to build our component or anything, by default Unity will automatically compile your code when you bring the editor back into focus.
Now, in order to see anything of interest, we’ll need to bring the Console tab to the forefront! You can click on the tab to select it, or drag the tab elsewhere so you can constantly see the console. Even if you aren’t a programmer, I highly recommend keeping the console always visible… and with that, we can click the play button at the top center of the editor, and see what happens!
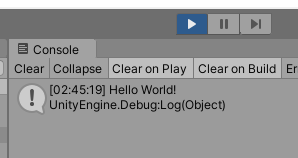
Hot damn! You’ve done a thing! Now, in order to demonstrate how unity works, lets go ahead and head back to the Hierarchy to our game object, and add the same component two more times, then run it again.
And just like that, we’re now running this program (Or more specifically, executing this component) 3 times in total. We can even create another game object if we want, and it to that object as well - As you’d expect, it’ll print out 6 times in total.
Something More Game-ish
“Ok, sweet. We can do something on ‘Start’ in a component, but there was totally an update function given to us too” you’re saying. And you’re right. The update function is similar in behaviour to if you started an infinite loop at the end of start - anything you do in here will get repeated every single loop, or ‘frame’. By default, your computer will do this as fast as physically possible. We know we have the transform component, and I happen to know that we can ask it to rotate.
So, lets create another component and add it to our game object. I’m going to remove the extra hello world scripts as well at this point.
Conveniently, Unity names things fairly nicely for us - We’ll call a provided template function quite literally called GetComponent, specify the name of the component we want - Transform in this case - and then ask it to Rotate. The Rotate function spins whatever you’re spinning like a top, but you have to tell it which way up is from the surface you’re spinning it on, and how fast to spin it by every frame. To do this, we create a new direction indicating up, and I chose the rather arbitrary speed of ‘1.5’. (Incidently, you can use GetComponent with your own custom as well!)
void Update()
{
    this.GetComponent<Transform>().Rotate(new Vector3(0, 1, 0), 1.5f);
}
If we run the game again, we can see the rotation values updating in the transform component! Nice! …but if we look at the game window, nothing is happening.
Ok, clearly it’s doing something… but we can’t see anything in the game. Never fear, this is where those commonly used game objects I mentioned at the start come into play. Lets try creating a Game Object from a 3D template, say, a cube, and attaching our script to it instead then run it! Note that the cube comes with some other components on it (The ones that make it show a cube), but we can minimize those so it’s easier to see our cube.
You might have noticed the cube is rotating kinda awkardly. That stuttering isn’t the gif recording tool I used, it’s actually happening on my end because the computer is trying to update as fast as it can, and inevitably it doesn’t always update at the same speed. So, lets improve the sitaution with the magic of DELTA TIME!
Delta time, commonly abbreviated as dt, is quite literally how long it’s been since update was last called, measured in seconds. This means the faster your machine goes, the smaller the number is, and the slower it is the larger. This is very convenient, because if we want something to spin at the same rate regardless of the situation, we can take Delta Time into account. This is a commonly used piece of data in games, so fortunately we can access it with Time.DeltaTime, and then multiply that arbitrary 1.5 by it to make sure the spinning is buttery smooth.
Our modified update loop now looks like this.
void Update()
{
    this.GetComponent<Transform>().Rotate(new Vector3(0, 1, 0), 1.5f * Time.DeltaTime);
}
Well, it’s certainly smoother and the rate the value in the inspector changes is less ridiculous, but now that it’s scaled consistently it really is a lot slower. We should really bump that 1.5 way up. But I don’t know what to, and it’s a bit inconvenient to edit the bowels of a script every time, so lets pull out that 1.5f movement speed into a variable.
Normally, that would this would be something as follows:
public class RotateAbout : MonoBehaviour
{
    private float spinSpeed = 1.5f;

    // Update is called once per frame
    void Update()
    {
        this.GetComponent<Transform>().Rotate(new Vector3(0, 1, 0), spinSpeed * Time.deltaTime);
    }
}
This is all well and good, and makes it a bit more maintainable… but what if we wanted to be able to change it without recompiling everything every time? Well, this is where we can mark our spinSpeed variable with something special: [SerializeField].
[SerializeField] private float spinSpeed = 1.5f;
This doesn’t change the code, but if we head back to the editor and let it recompile, then select our cube…
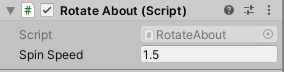
… We can now see the value in the inspector window of the component, and it even used our variable name!
Chaning the value in here doesn’t change what that default value in the script is in the actual file, but, it does change the value that the component itself uses when we run the game! Try playing with that value a bit both before while the game is running, and watch the cube shift. Note that you can drag over the name of a variable to increase or decrease its value in the inspector, or enter values directly.
You’ll notice that values set before the game starts running stick regardless of if I click out or not, but if I modify the value once the game is running, it reverts back to its prior value. This is important behaviour to remember!
Unity displaying values in the inspector is something you’ll generally specify with private variables using that attribute above, but in the case of public variables, they’re automatically visible in the inspector. Generally, it’s recommended that you keep your variables private so you can best control what is and isn’t visible in the inspector window, and to other components.
Projecting to the Astral Plane
Ok, lets get to what makes games, well, games: They’re interactive media. A player won’t have this whole editor to play the game, so we’ll want to be able to observe and react to user inputs while the game is running.
We’ll once agian modify the data in the Transform component of the cube, but this time, we’ll adjust the position instead of the rotation. Lets make a new Component called CubeMover, and explore the Input class inside of the update loop. The input class has a variety of helpful functions to explore, and it’s a great candidate for if statements. When using functions, you generaly specify what’s called a ‘key code’ for the key you want to use - in this case, I want to use space. (Bonus: If you’re not sure, you can also use the inspector to set the key code much like with the spin speed!)
void Update()
{
	if(Input.GetKey(KeyCode.Space))
	{
		// a s c e n d
	}
}
Now, for actually moving the cube. I want to move it up compared to where it was last time, once again scaled by delta time. What I’ll do is I’ll first get the transform, then take the old position and update it relative to where it was. This makes my update function look as follows:
void Update()
{
    if(Input.GetKey(KeyCode.Space))
    {
        Transform myTransform = this.GetComponent<Transform>();
        Vector3 lastPos = myTransform.position;
        myTransform.position = new Vector3(lastPos.x, lastPos.y + 10 * Time.deltaTime, lastPos.z);
    }
}
Just like earlier, I’m calling GetComponent to get the transform component, then I’m changing a value in it, in this case based on the prior value. Lets make sure our component is on the cube, and then select play! The cube starts spinning immediately, but there’s some delay before I decide to hold down the spacebar.
And that’s that!
As a bit of an extra, you can try combining what we know about duplicate components and add some other spinning cubes for moral support, and position them in the scene a bit different. More cubes can be created either through the menu or with copy and paste - through the menu you’ll have to add your components, but if you copy and paste, all components and their values come with for better or worse. You can then use scene view to modify the positions of the cubes.
A Note on Transform and Delta Time
Using these two things is very common, and so there are some shortcuts you can take to access or use them.
Transform is used a lot, so you can actaully get the transform component of the game object your component is paired with by using the transform property that’s on every component. This means getting your X position is as easy as transform.position.x!
Now, delta time isn’t quite as commonly used as transform, but it’s still certianly up there so it’s got a few shortcuts as well. Sometimes, you have operations you want to perform very consistently on an object - perhaps like the rotations demonstrated above, or similar, but you don’t wish to mess with Time.DeltaTime and instead want it to update alongside all other unity physics code - there’s a function for that. It’s called FixedUpdate, which you can implement in any component in addition to Update that’ll keep you from having to scale by dt while inside it.
Because this function is tied to unity’s physics, you only really want to put things related to object movement or physics in this function. Bogging it down is a bad idea, and can lead to negative experiences in your game. Remember: “When in doubt, Deta Time it out!”
…In fact, there are a whole number of other nifty functionscalled in components at various points! Some neat ones are Awake, OnEnable, and OnDisable!
Copyright © 2019-2020 Loam LLC - all rights reserved. Trademarks belong to their respective owners.