Creating Low-cost Websites
This guide aims to provide you with the tools to set up a website for free or at very low cost. While some services appearing in the tutorial may have paid tiers, they never need to be used!
The only thing to really consider consider buying at some point is a custom domain though Google Domains, the main reason being that I’m familiar with their services and they have reasonable pricing.
What Tech is Used?
The template sites on the Loam Resources Page are hand-written using Bootstrap and Font Awesome for actual page content. Bootstrap is an open source toolkit that makes things look not as terrible when you resize a page, and provides some nice defaults. Font Awesome, on the other hand, is a sweet way to add professionally designed icons to things! In addition, Google’s Material Design icons and themes occasionally make an appearance.
For hosting, this tutorial uses GitHub Pages. If you don’t like the idea of fiddling with HTML and just want a theme-maker, you can use their built-in one and skip this tutorial entirely. If you’d like Loam to set up the website for you or provide more customized websites with more features, consider checking out our services page or sending us an email to ask about what we can do for you!
Getting Started
To make a website with this tutorial, you’re going to need a GitHub account, but wait, finish reading this paragraph before you make it. You should probably name it something like your name, or something close to your name for the purposes of looking professional, or the name of your organization. yourGitHubUsername.github.io will be how the site appears if you don’t buy a custom URL, so keep that in mind when choosing a name.
Go ahead and make a GitHub repository under the repositories tab on your account page - for testing to make sure it’s set up correctly, make the name yourGitHubUsername.github.io and for ease of use, indicate that you want a ReadMe to be created for you - your site will be live at https://yourname.github.io! You can do this with a differently named repo as well if you wish, you’ll just have to make sure you turn on github pages in the first section below.
All things considered, if you don’t care about a custom URL, you’re done. Just grab one of the example sites and the assets folder and plop them in your own (You can just drag and drop into your repository in a web browser), and you’re good to go!
If you’re after a custom domain tho, carry on! You’ll learn about how to set that up, and a lot more. For this tutorial, gifs will often be demoing the setup of a website called theportfolio.pw, which as the original website for this set of templates!
Configuring GitHub’s side for a custom URL:
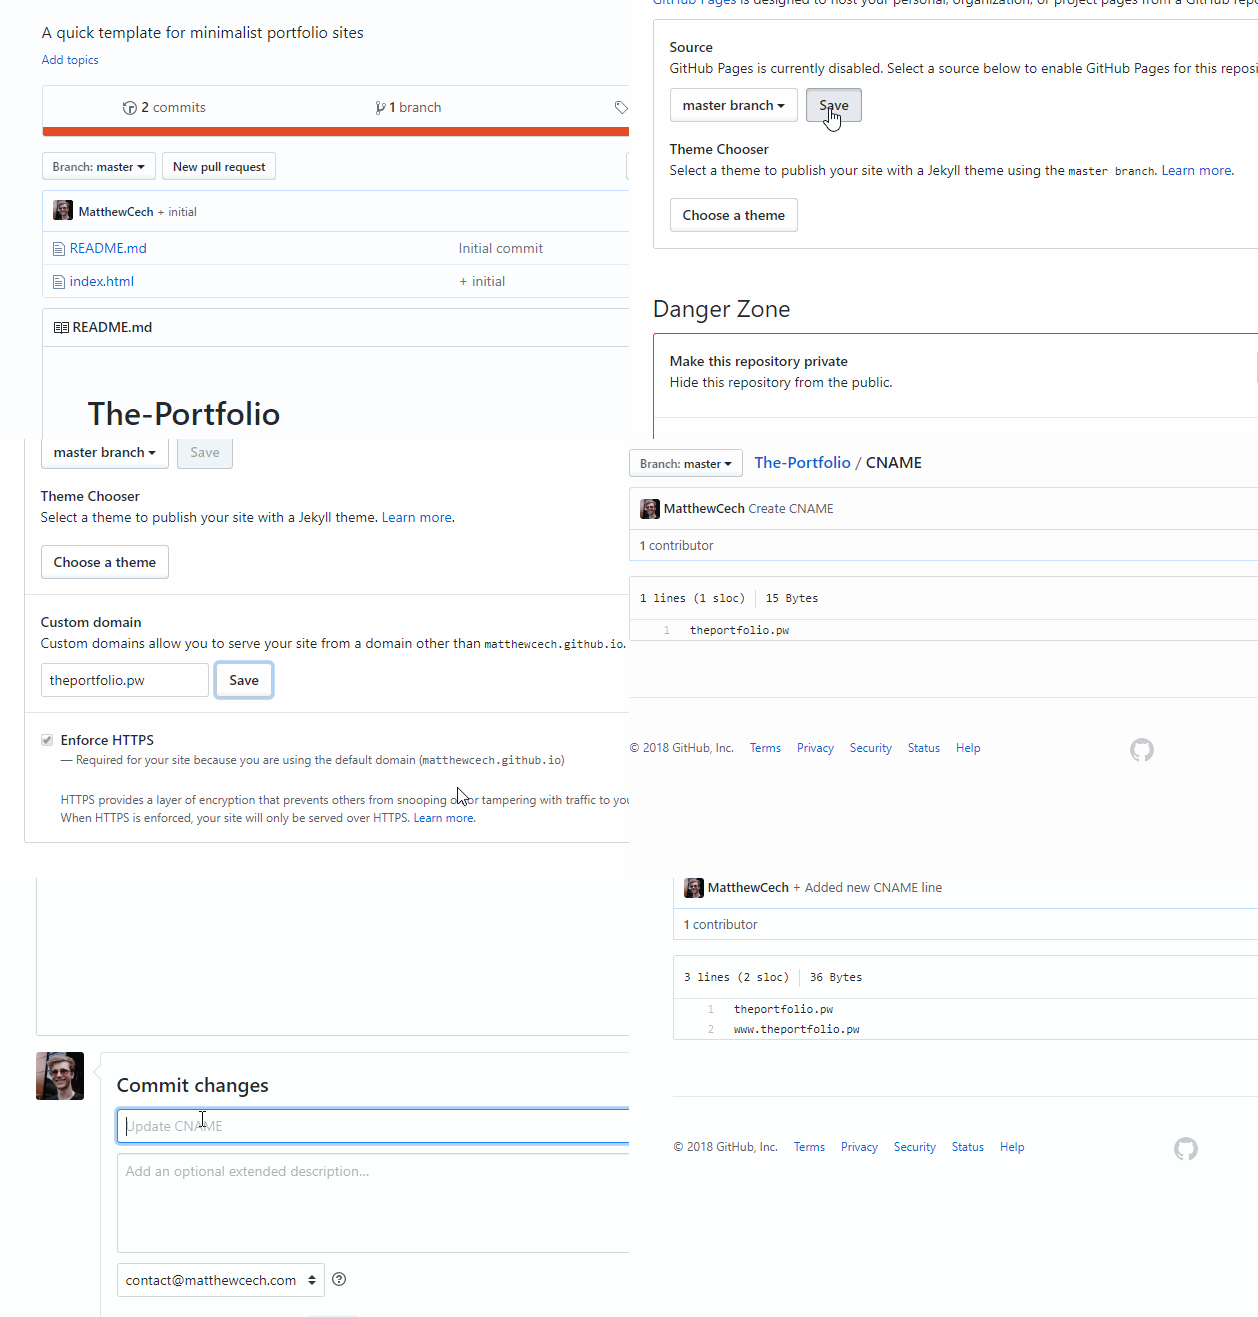
- Head to repo settings
- Find the secion about github pages. If you have not enabled it, do so, probably on master branch. (Stop here if you don’t want a custom domain!)
- Once enabled, specify your custom domain.
- If you look in the repo root, we see a CNAME file was added!
- It’s good practice to add a www.
variant. You can do this in-browser by clicking the edit button.
Configuring Google Domains
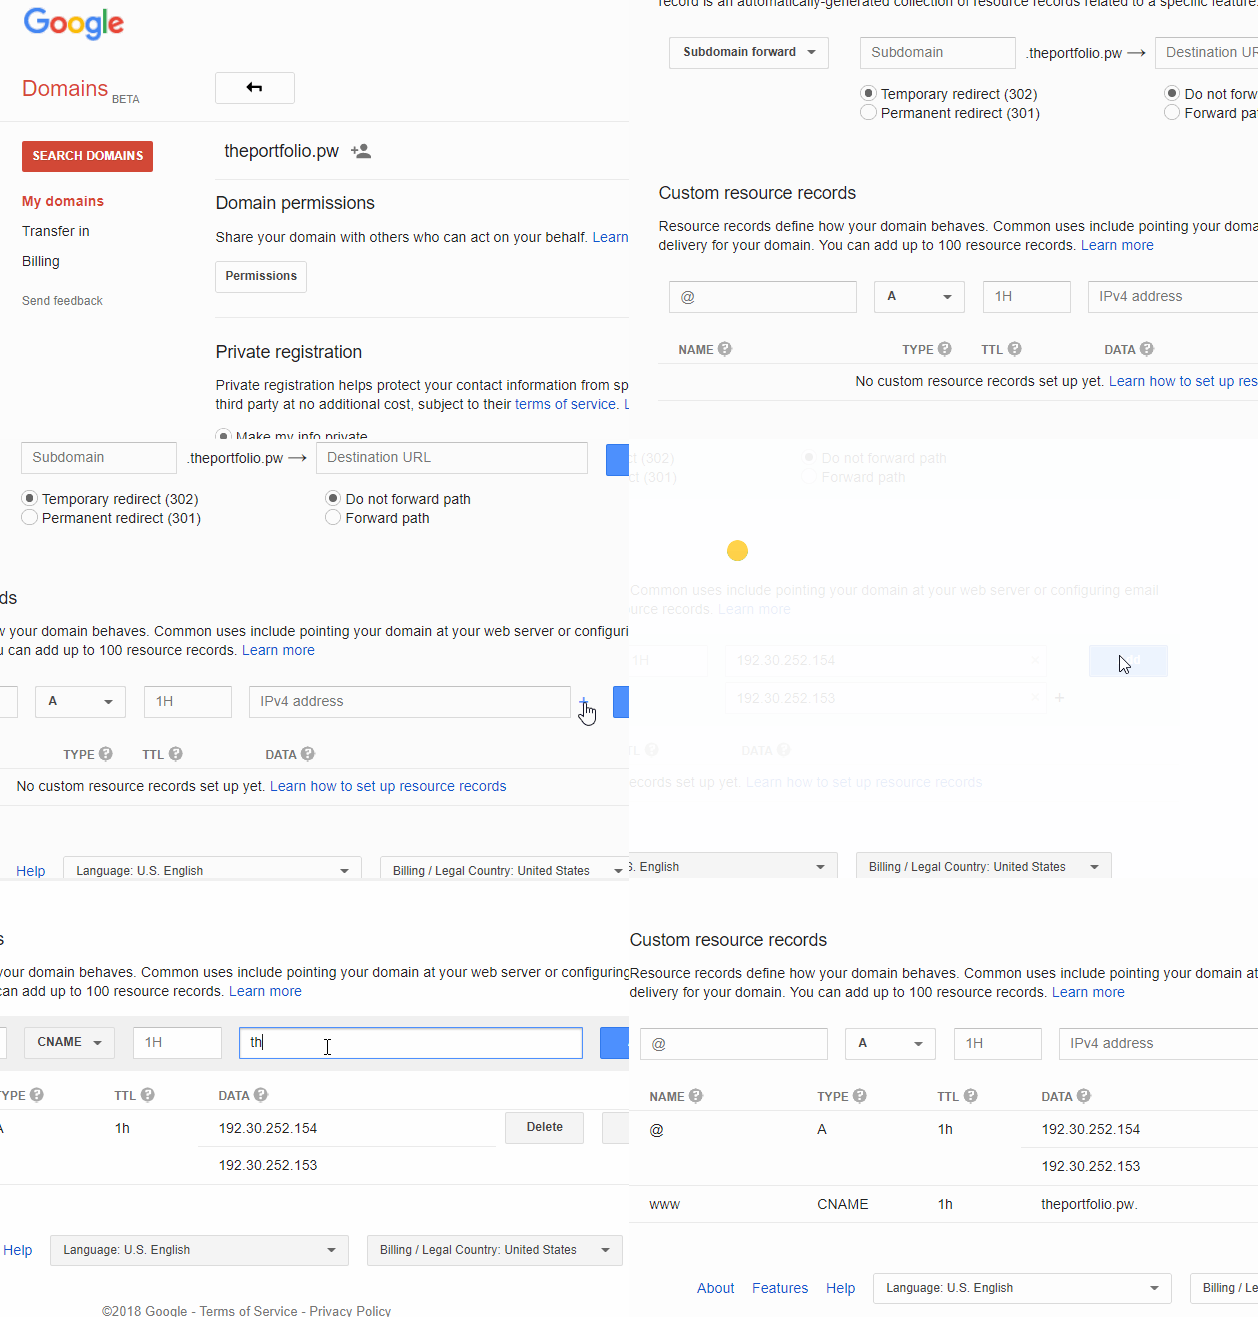
- Go to domains.google.com and navigate to the domain you wish to point at github.
- Head to the DNS tab (second from the right, looks like stacked boxes)
- Scroll all the way down to the records section
- Add an
Aname record for both of github’s IP addresses: This way, we point the base site at github pages.Github IPs are192.30.252.154and192.30.252.153at the time of writing.- 2020 UPDATE: Github’s recommended IP addresses changed to (
185.199.108.153), (185.199.109.153), (185.199.110.153), and (185.199.111.153). You don’t have to use all when configuring the a name records, but the more you use, the better. The process for specifying them is in google domains still the same otherwise.
- Add a CNAME record, with
wwwfilled in as the record name. We will direct this to the domain itself, just without the www
Google domains is fast. Like, really fast. Realistically, you can probably navigate to your new site right after setting all that up, so go ahead and test that out in incognito/private browsing mode so that we don’t have old things cached. Worst case, this will take an hour.
HTTPS (Optional, but not really optional)
At this point, we have your domain hosted at github pages. We have a custom domain rerouting HTTP requests. However, there’s no HTTPS going on, and you still need a site. For now, we should get you set up with HTTPS routing.
We’ll be using cloudflare in order to force connections to be HTTPS. They don’t make you pay for an SSL certificate, which is nice.
We’ll start by making an email to use with Cloudflare. This can be done using one of the many free email forwards you get with a custom domain. You can skip the first step if you would prefer to make a different Cloudflare account, or use an existing one.
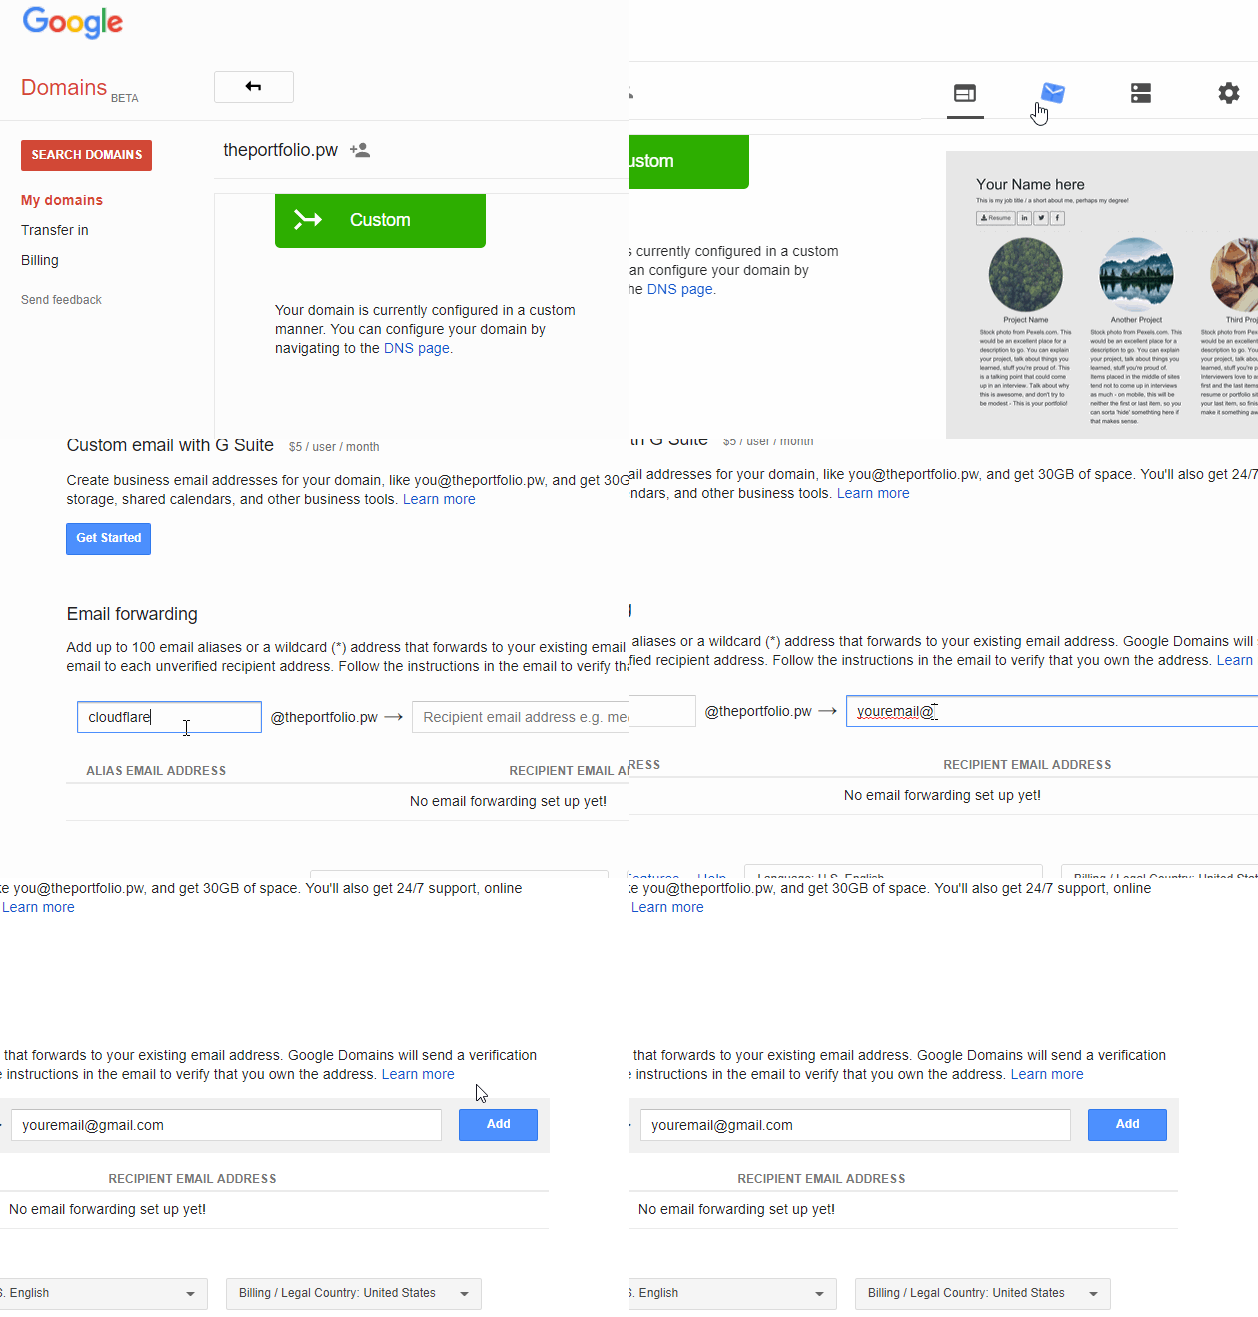
- Go to domains.google.com and navigate to the domain you’ve been using for this
- Click on the mail tab, second from the left, and scroll down.
- Enter
cloudflareas the email name, and route it to an email you own already. - As necessary, confirm the email. If you forward to the email you used for registering the domain, no confirmation is necessary.
Next, we’re going to be setting up a cloudflare account, and fight out way to the console.
- Head to Cloudflare.com
- Click on the ‘log in’ button in the upper right of the site, and proceed to make an account. For your email, use the email you just created.
- Once you have created an account, you will be asked to specify the name of your site. Do so with your custom URL.
- From here, you will be asked to select a plan. For our purposes, the free one is just fine.
- After confirming the plan, Cloudflare will query the existing DNS for all records. You should see 3 records that you made: the 2 A records that go to githubs IP, and the CNAME record. You will also see MX records for goole email servers.
- If all records are present, continue. This should take you to the last step before the console.
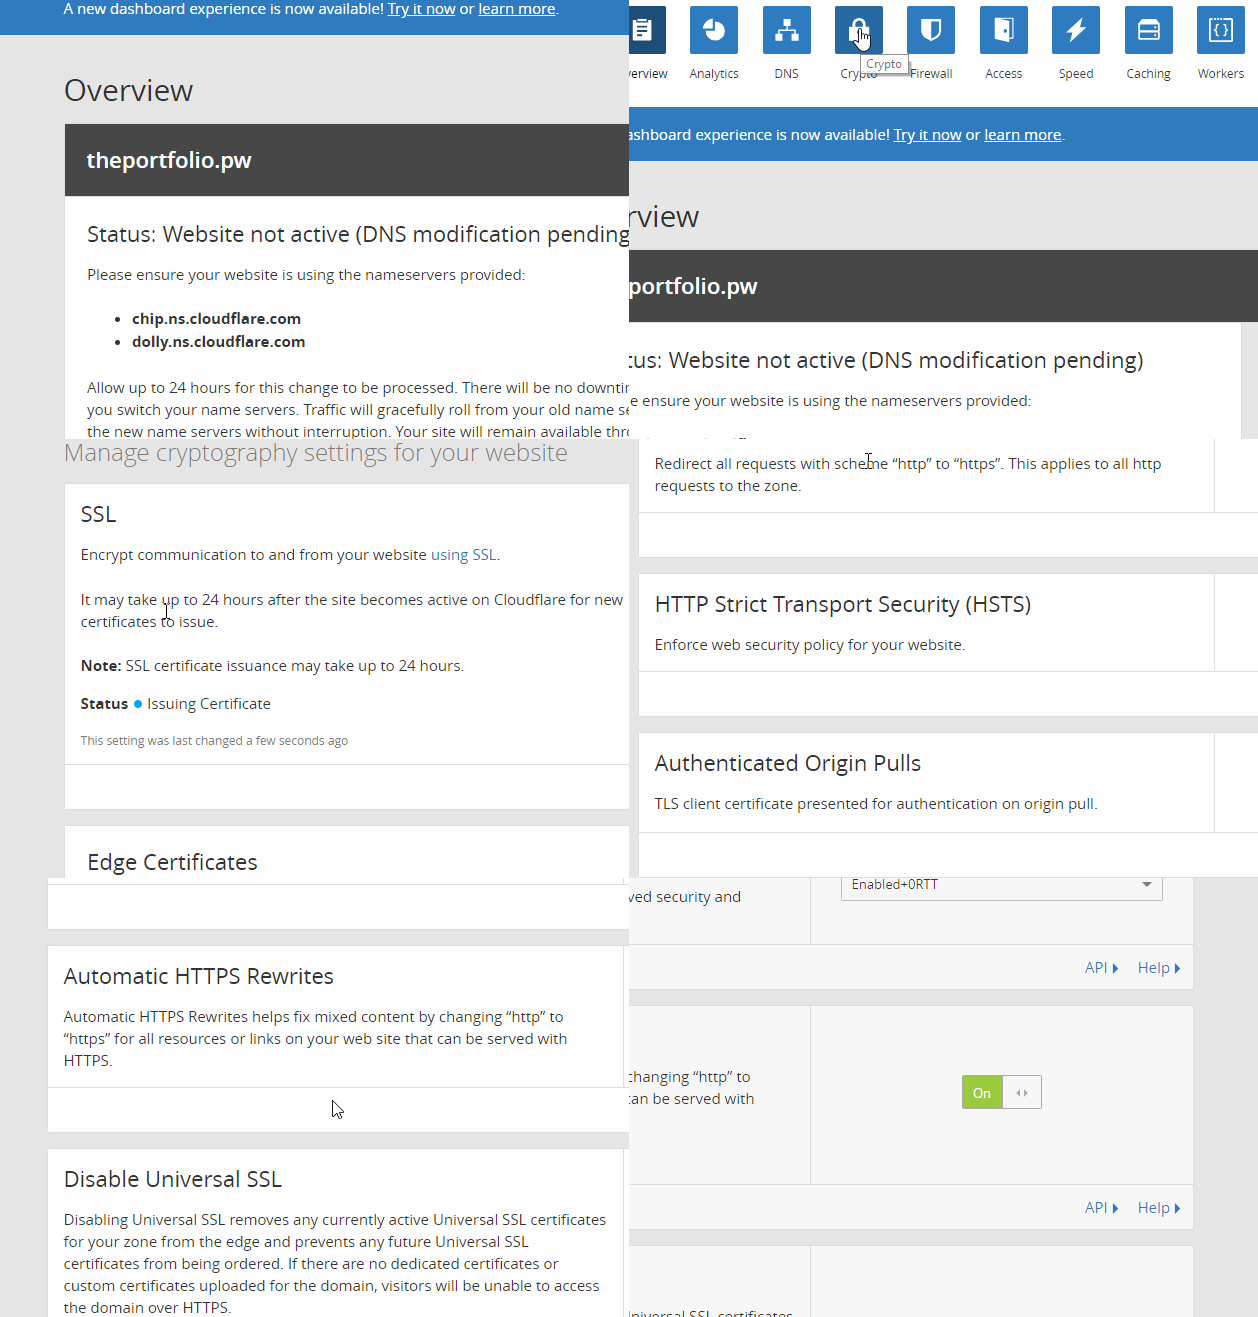
- You will then be asked to update the name servers. Go back to the DNS records section of your custom domain, and go ahead and find the nameservers section at the top. Copy in the ones Cloudflare specifies.
- Once updated. you will then be at the console.
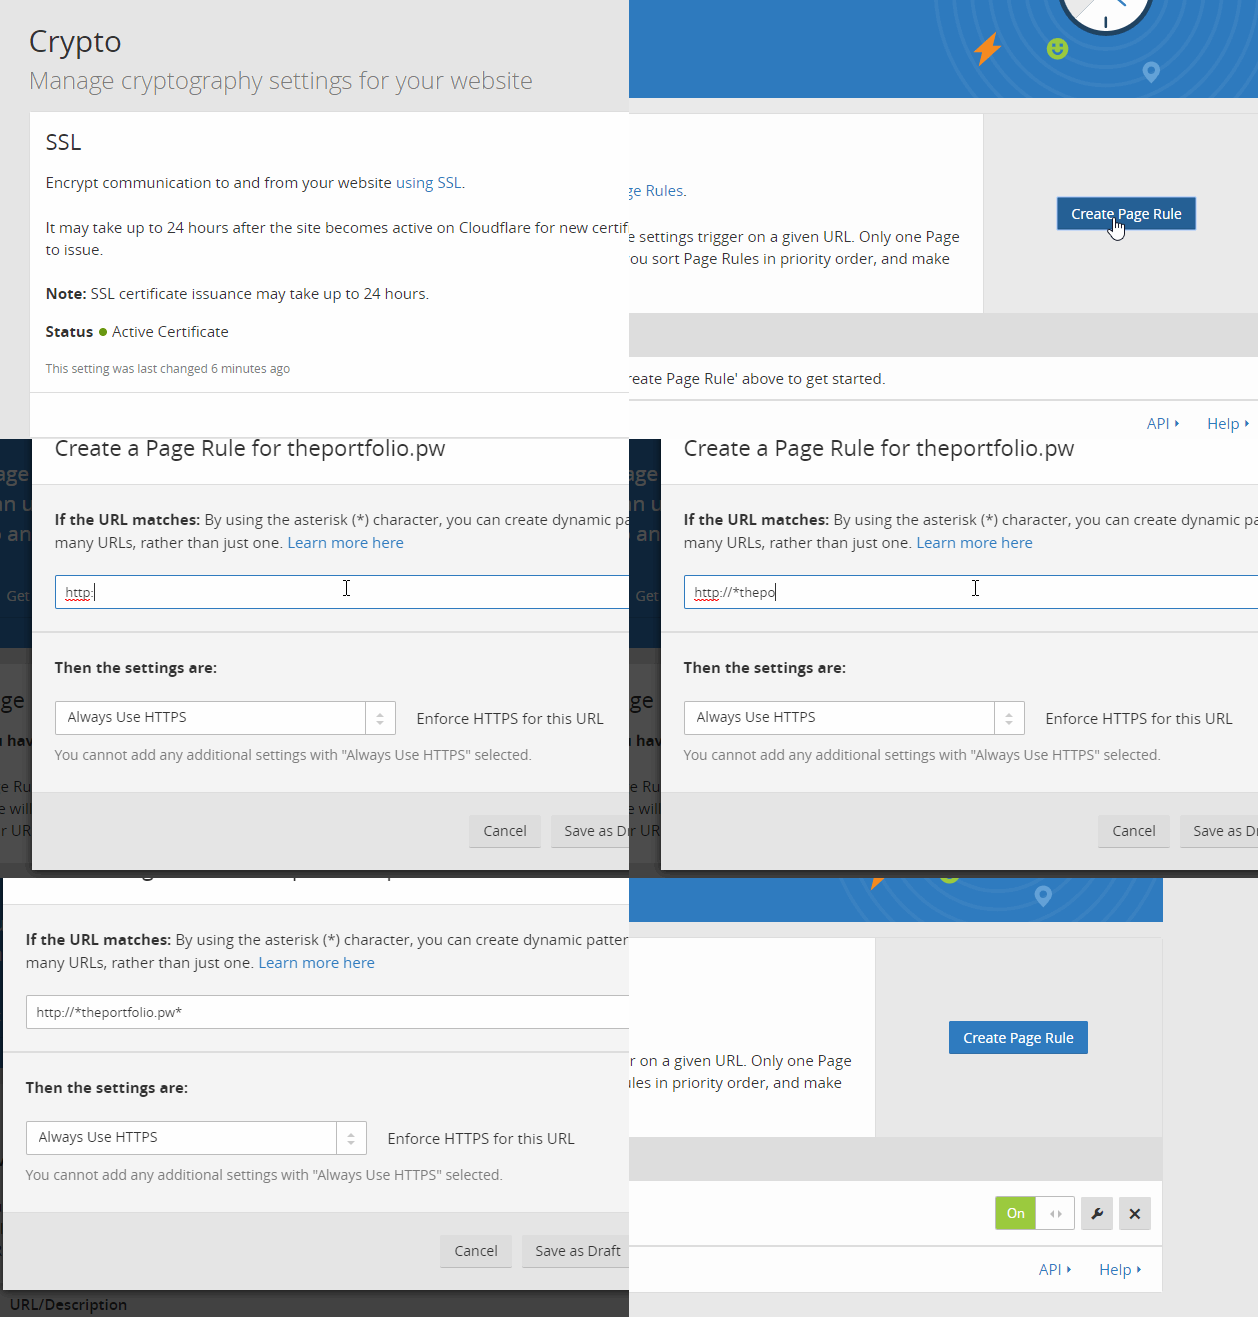
Second to last, we’re going to set up an SSL certificate.
- In cloudflare, head to the Crypto tab at the top
- Under SSL at the top, select ‘flexible’ from the drop down. We’re going to need a flexible certificate.
- turn ‘Always use HTTPS’ on
- turn ‘Automatic HTTPS Rewrites’ on
Finally, we’re going to force everything to be rewritten to HTTPS. Because Security. Also looks professional. Also improves search result rating.
- Head to the page rules tab at the top
- Create a new page rule for “Enforce HTTPS”
- If you don’t see this yet, you’ll probably need to wait a few minutes for the SSL certificate to finish applying!
- Enter your site URL modified as follows:
http://*yoursitename.com*
In the crypto tab, if the certificate says “active” and if in the overview tab it says “Status: Active” then you’re good to go for HTTPS. Try navigating to your page now! It should say “secure” to the left of the URL.
You’re done! Good work!
Afterthoughts
You’ll need to update information in the template that’s in this repo. A text editor that does color syntax highlighting for HTML is recommended - Something like Sublime Text, Notepad++, Atom, or many others!
If you’re looking to test the website out locally before launching, a local webserver is quite useful. There’s a free, single executable webserver called Mongoose that’s available for download on their website - just plop it in your directory, and double-click to start it! If you’re using it for something professional, you’ll want to pick up a Pro license for $10.
Copyright © 2019-2020 Loam LLC - all rights reserved. Trademarks belong to their respective owners.
